
Connect Fluent Forms to FluentCRM with Double Opt-in
A complete WordPress newsletter setup: a Fluent Forms signup form, the FluentCRM integration feed, double opt-in confirmation, a welcome automation, FluentSMTP delivery and a full test plan.
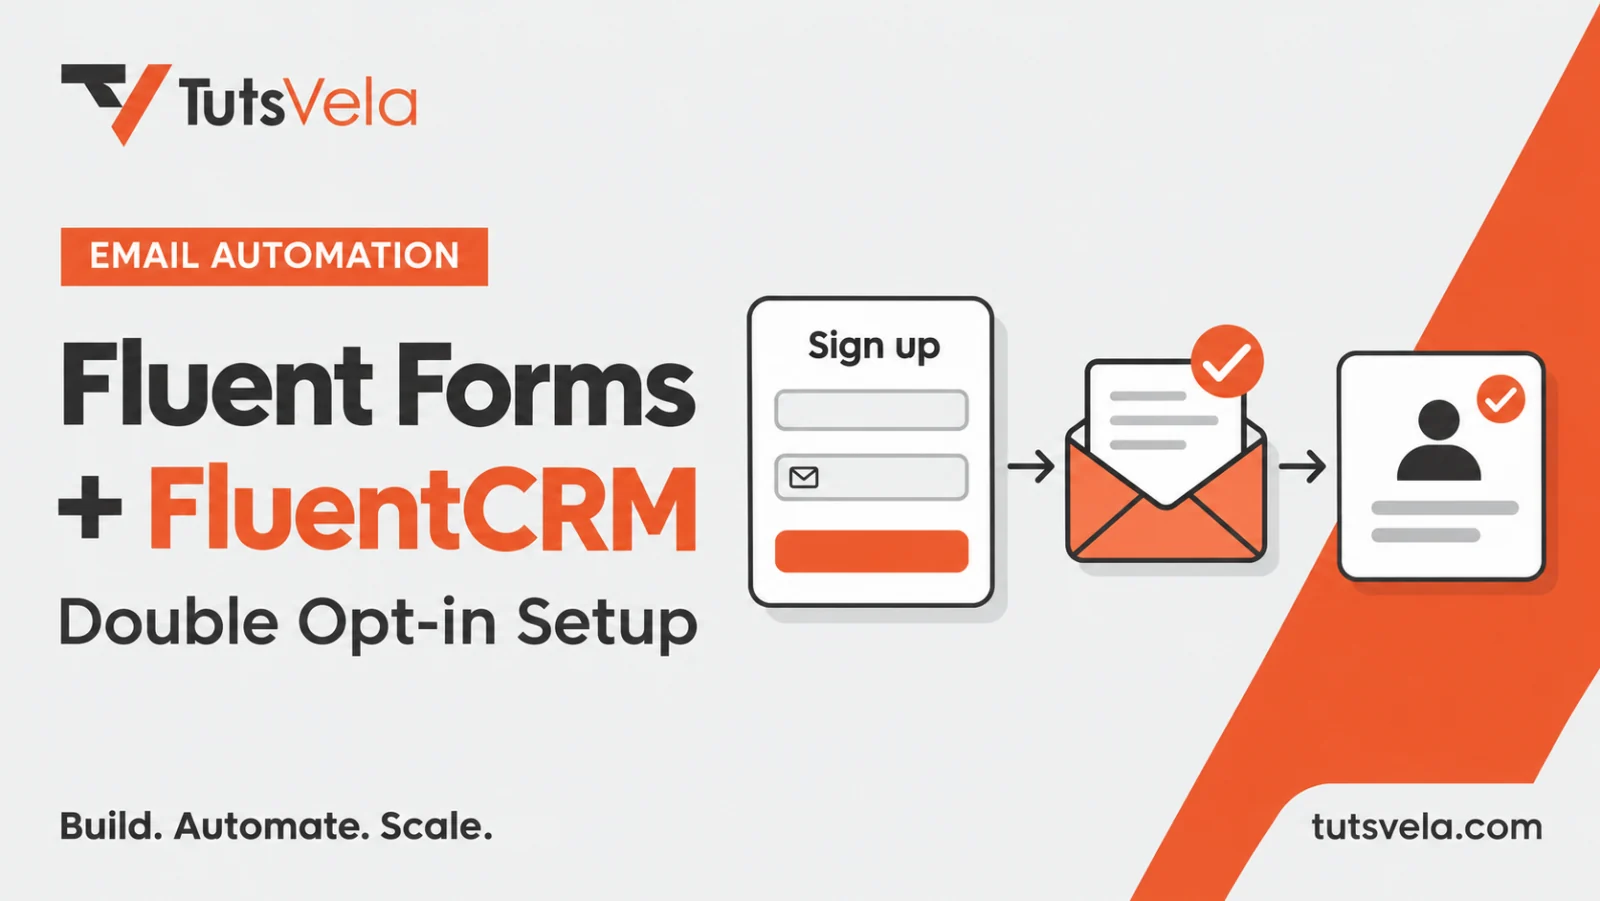
A newsletter form that adds people straight to your mailing list is easy to build and easy to get wrong. Typos, fake addresses and people who never meant to subscribe all end up on the list. FluentCRM double opt-in fixes that: a new subscriber stays Pending until they click a confirmation link, and only then do they receive your newsletter.
This tutorial builds the complete journey with Fluent Forms and FluentCRM, from the signup form to the welcome email and the unsubscribe link. It uses Fluent Forms 6.2 and FluentCRM 3.3 with their Pro add-ons where noted, and FluentSMTP for delivery. The core workflow was tested on a staging site with FluentSMTP’s Email Simulation turned on, so no real emails were sent; anything not tested is marked as such.
What we are building
1. Form
Visitor signs up
Fluent Forms collects the email address and an optional first name.
2. Contact
Pending in FluentCRM
The integration feed creates the contact as Pending, on your list.
3. Confirmation
Email with a button
FluentCRM sends one confirmation email with an activation link.
4. Subscribed
Welcome email
The click sets the status to Subscribed and the welcome automation runs.
The subscriber journey. Every marketing email after step 4 includes an unsubscribe link, which completes the cycle.
What You Need Before Starting
|
Component |
Required? |
Why |
|---|---|---|
|
WordPress with admin access |
Required |
To install plugins and change settings |
|
Fluent Forms (free) |
Required |
Builds the signup form and its confirmation message |
|
FluentCRM (free) |
Required |
Stores contacts, sends the double opt-in email, runs automations |
|
FluentCRM Pro |
Optional |
Adds triggers such as List Applied and tag-based confirmation redirects |
|
Fluent Forms Pro |
Optional |
Not needed for this workflow; its own double opt-in should stay off |
|
FluentSMTP and a sending service |
Strongly recommended |
Sends email through an authenticated provider instead of the server’s default mail |
|
A test inbox and a staging site |
Strongly recommended |
So you can test without emailing real people |
Fluent Forms vs FluentCRM: What Does Each Plugin Do?
The two plugins are made by the same company and work closely together, but each owns a different part of the job. Knowing which is which saves a lot of troubleshooting.
|
Job |
Owned by |
Where |
|---|---|---|
|
Show the form and validate the email |
Fluent Forms |
Fluent Forms, Forms, your form |
|
Message shown after submitting |
Fluent Forms |
Settings & Integrations, Confirmation Settings |
|
Create or update the contact, list and tags |
FluentCRM (through its integration feed) |
Settings & Integrations, Configure Integrations |
|
Confirmation email and what happens after the click |
FluentCRM |
FluentCRM, Settings, Email Settings, Double Opt-in Settings |
|
Welcome email after confirmation |
FluentCRM automation |
FluentCRM, Automations |
|
Delivering the emails |
FluentSMTP and your sending service |
Settings, FluentSMTP |
The form’s “thank you” message only confirms that the form was sent. At that moment the contact is still Pending. Write that message as “check your inbox”, never as “you are subscribed”.
Step 1: Create a Newsletter Signup Form
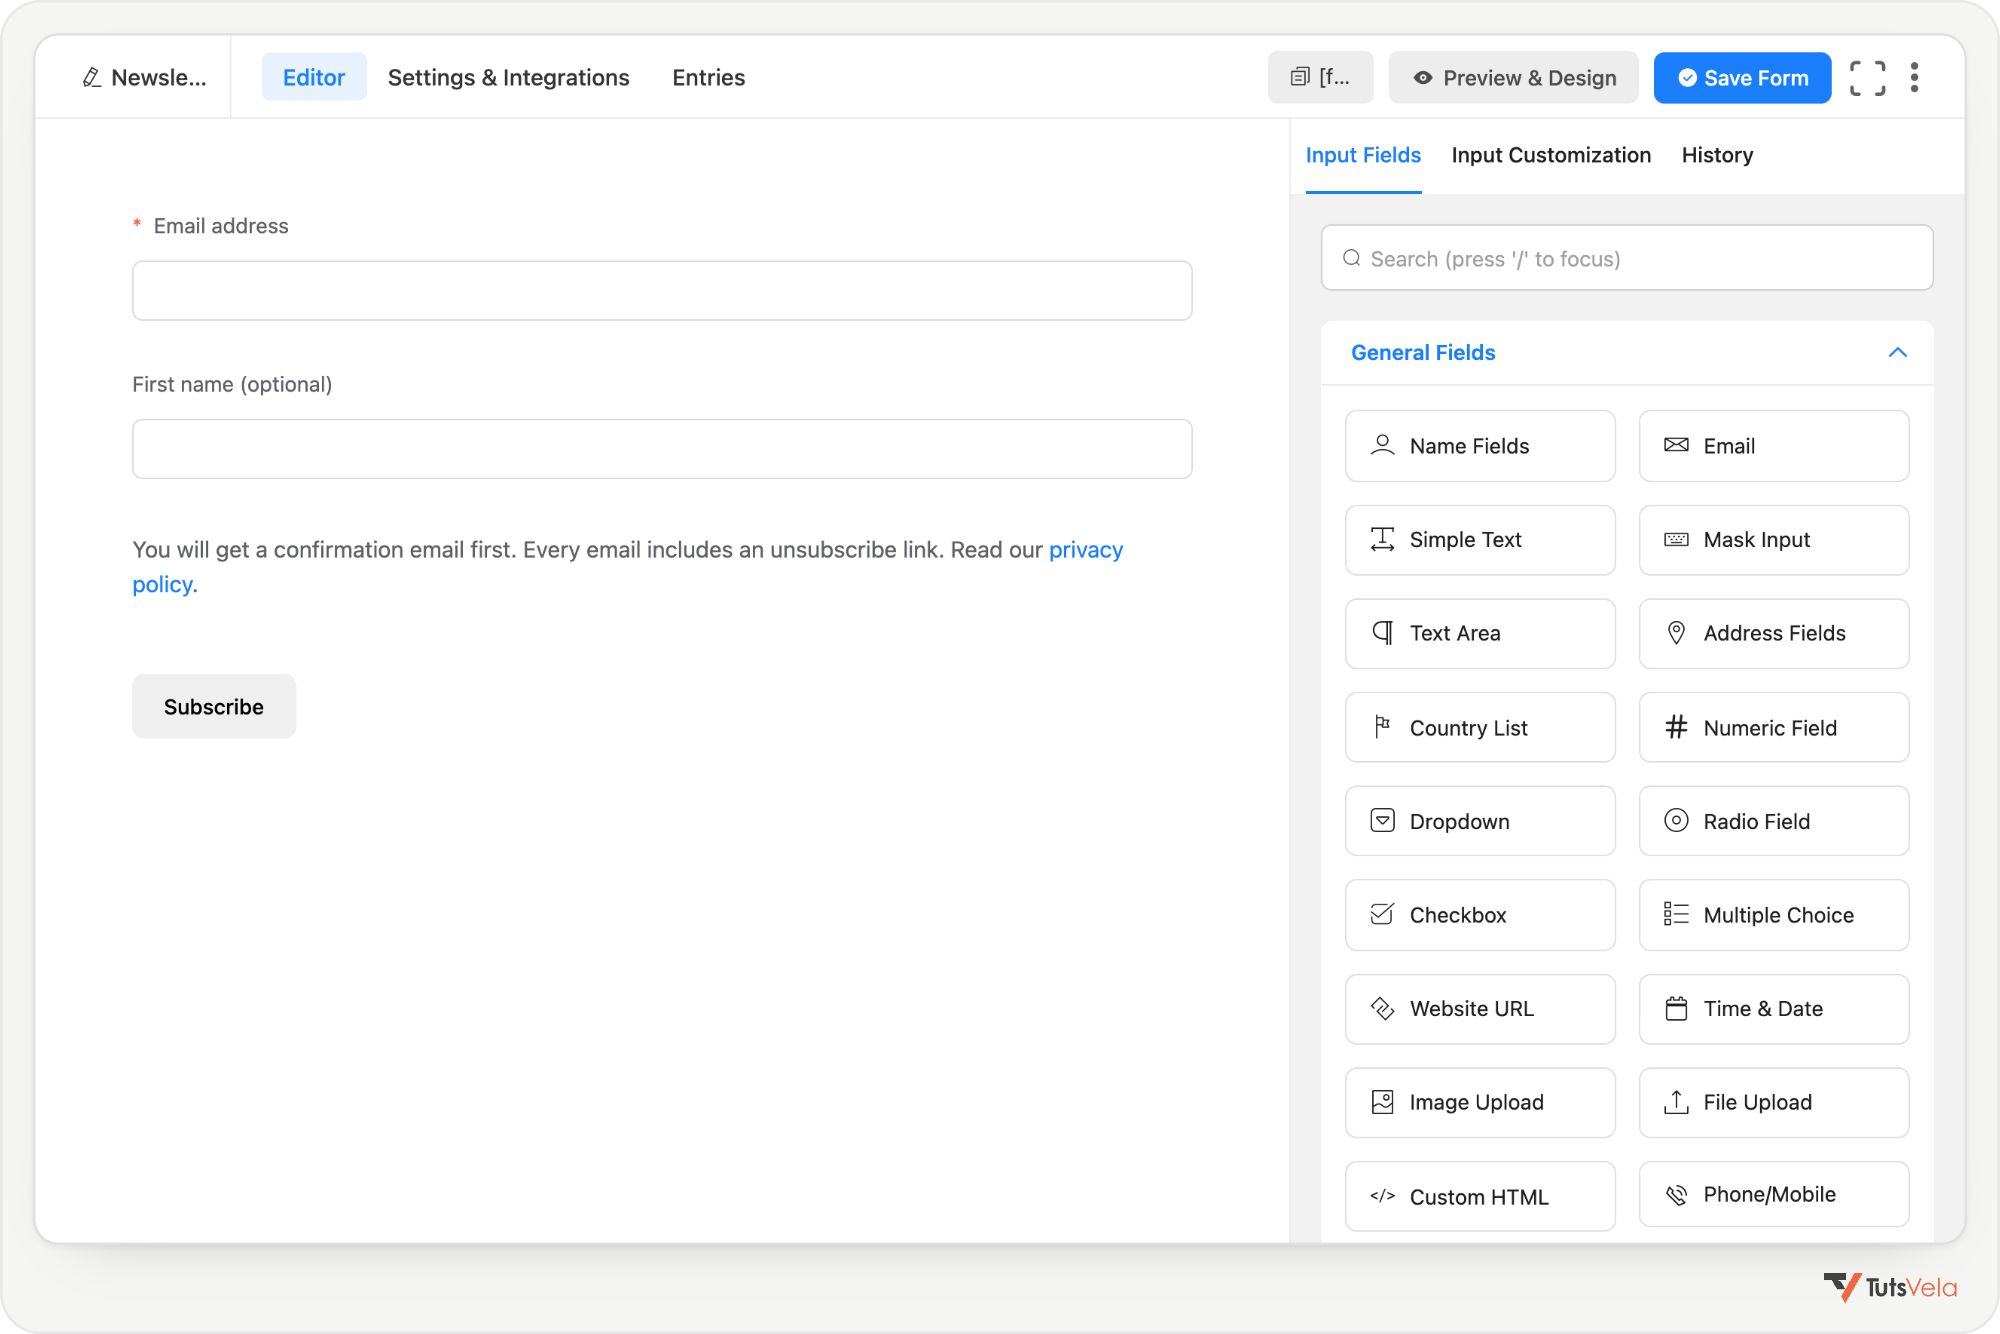
Go to Fluent Forms, New Form and start from a blank form. Keep it short: every extra field lowers signups and gives you more personal data to protect.
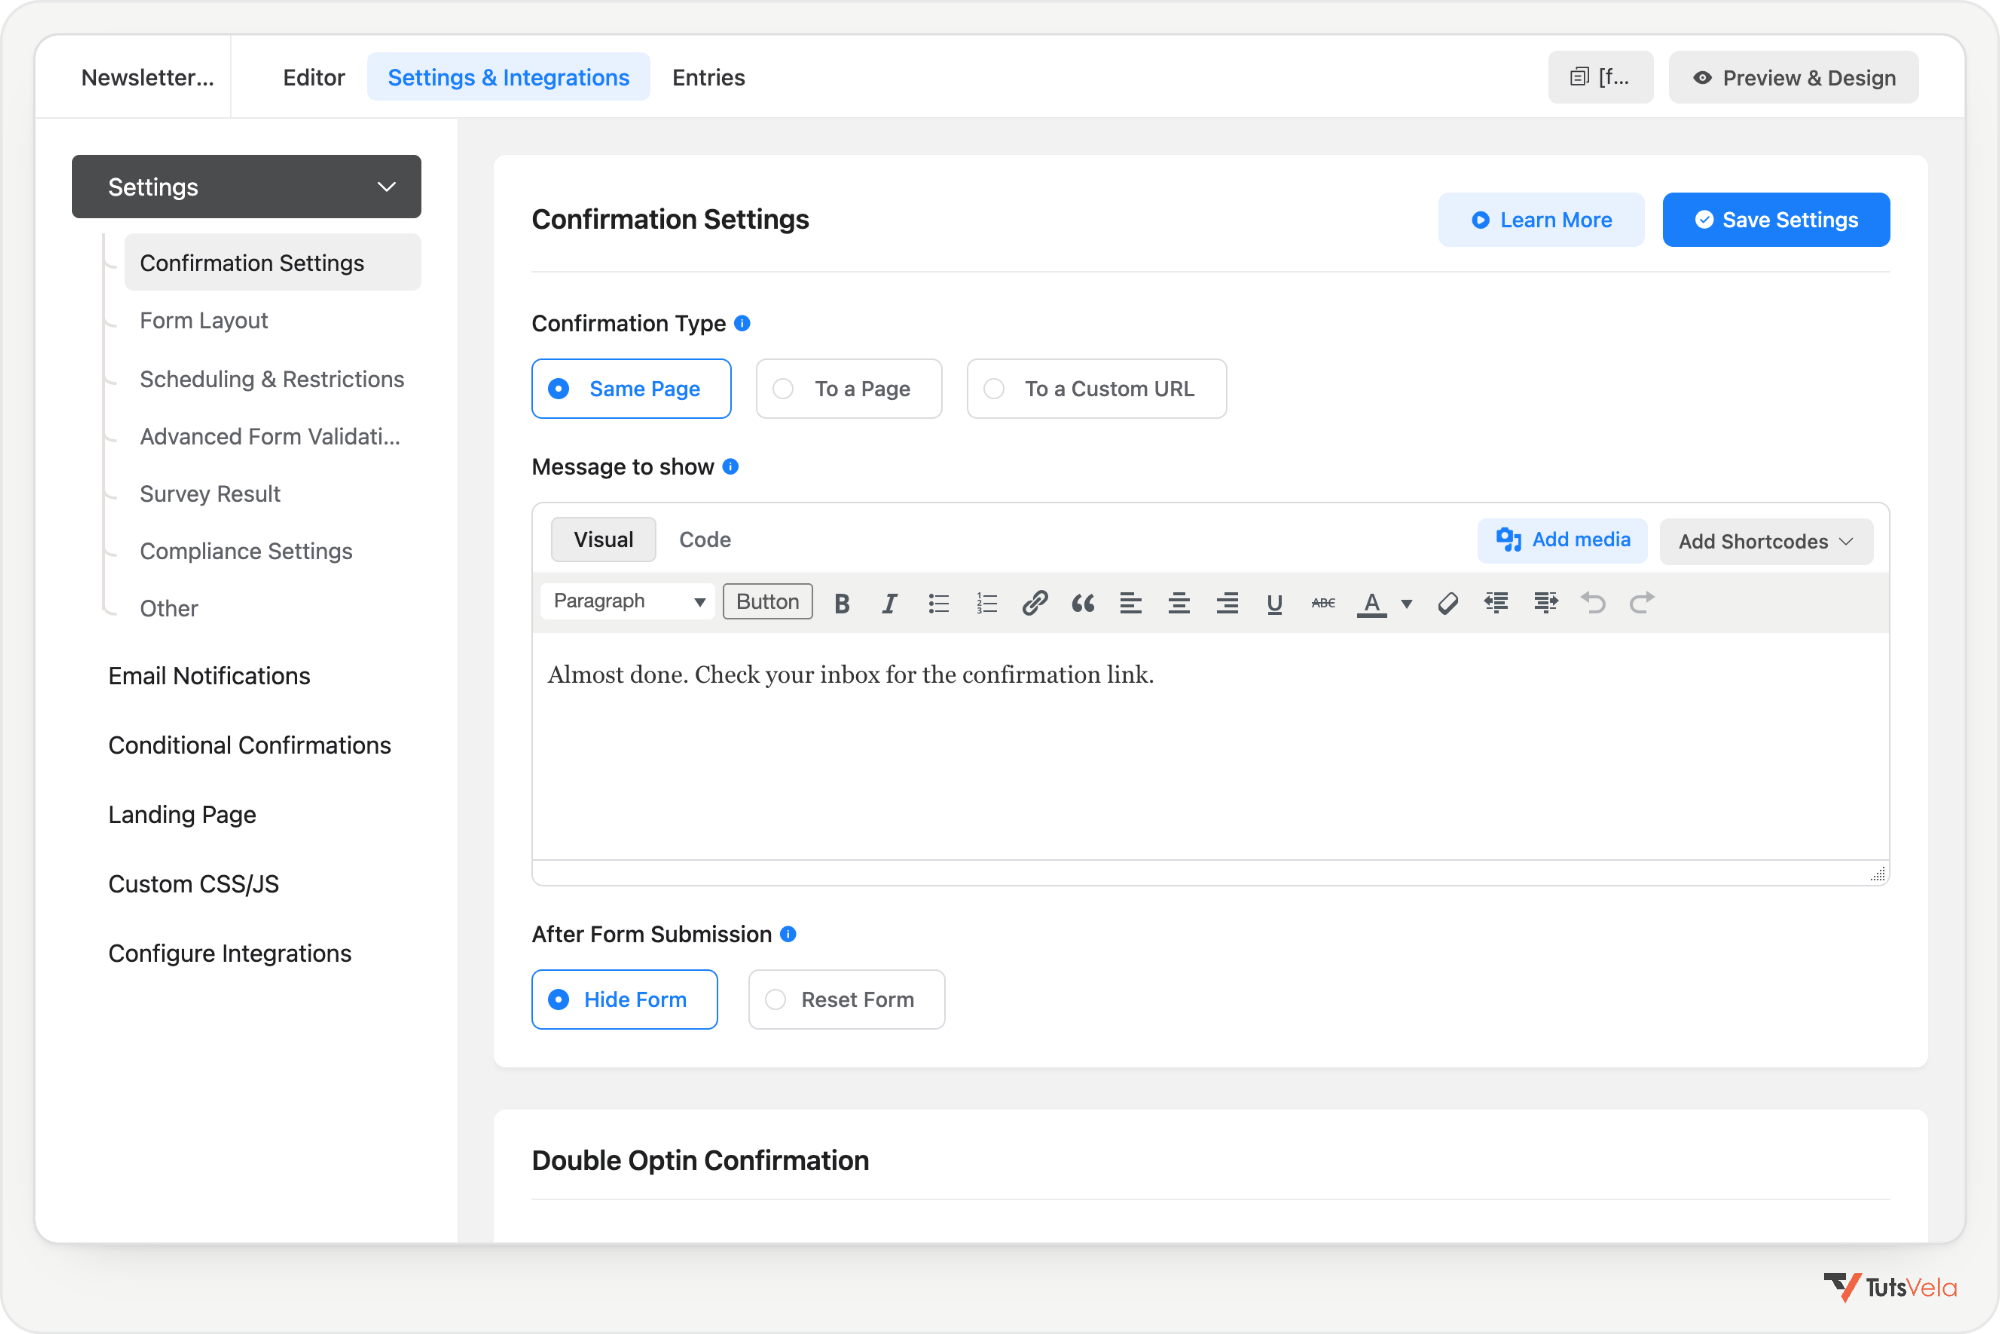
Then set the on-page response. Open the form’s Settings & Integrations tab, then Confirmation Settings. Choose a Confirmation Type: Same Page shows a message (with Hide Form or Reset Form after submission), while To a Page redirects to a page you select. A message like “Almost done. Check your inbox for the confirmation link.” works well. Click Save Settings.
Step 2: Connect Fluent Forms to FluentCRM
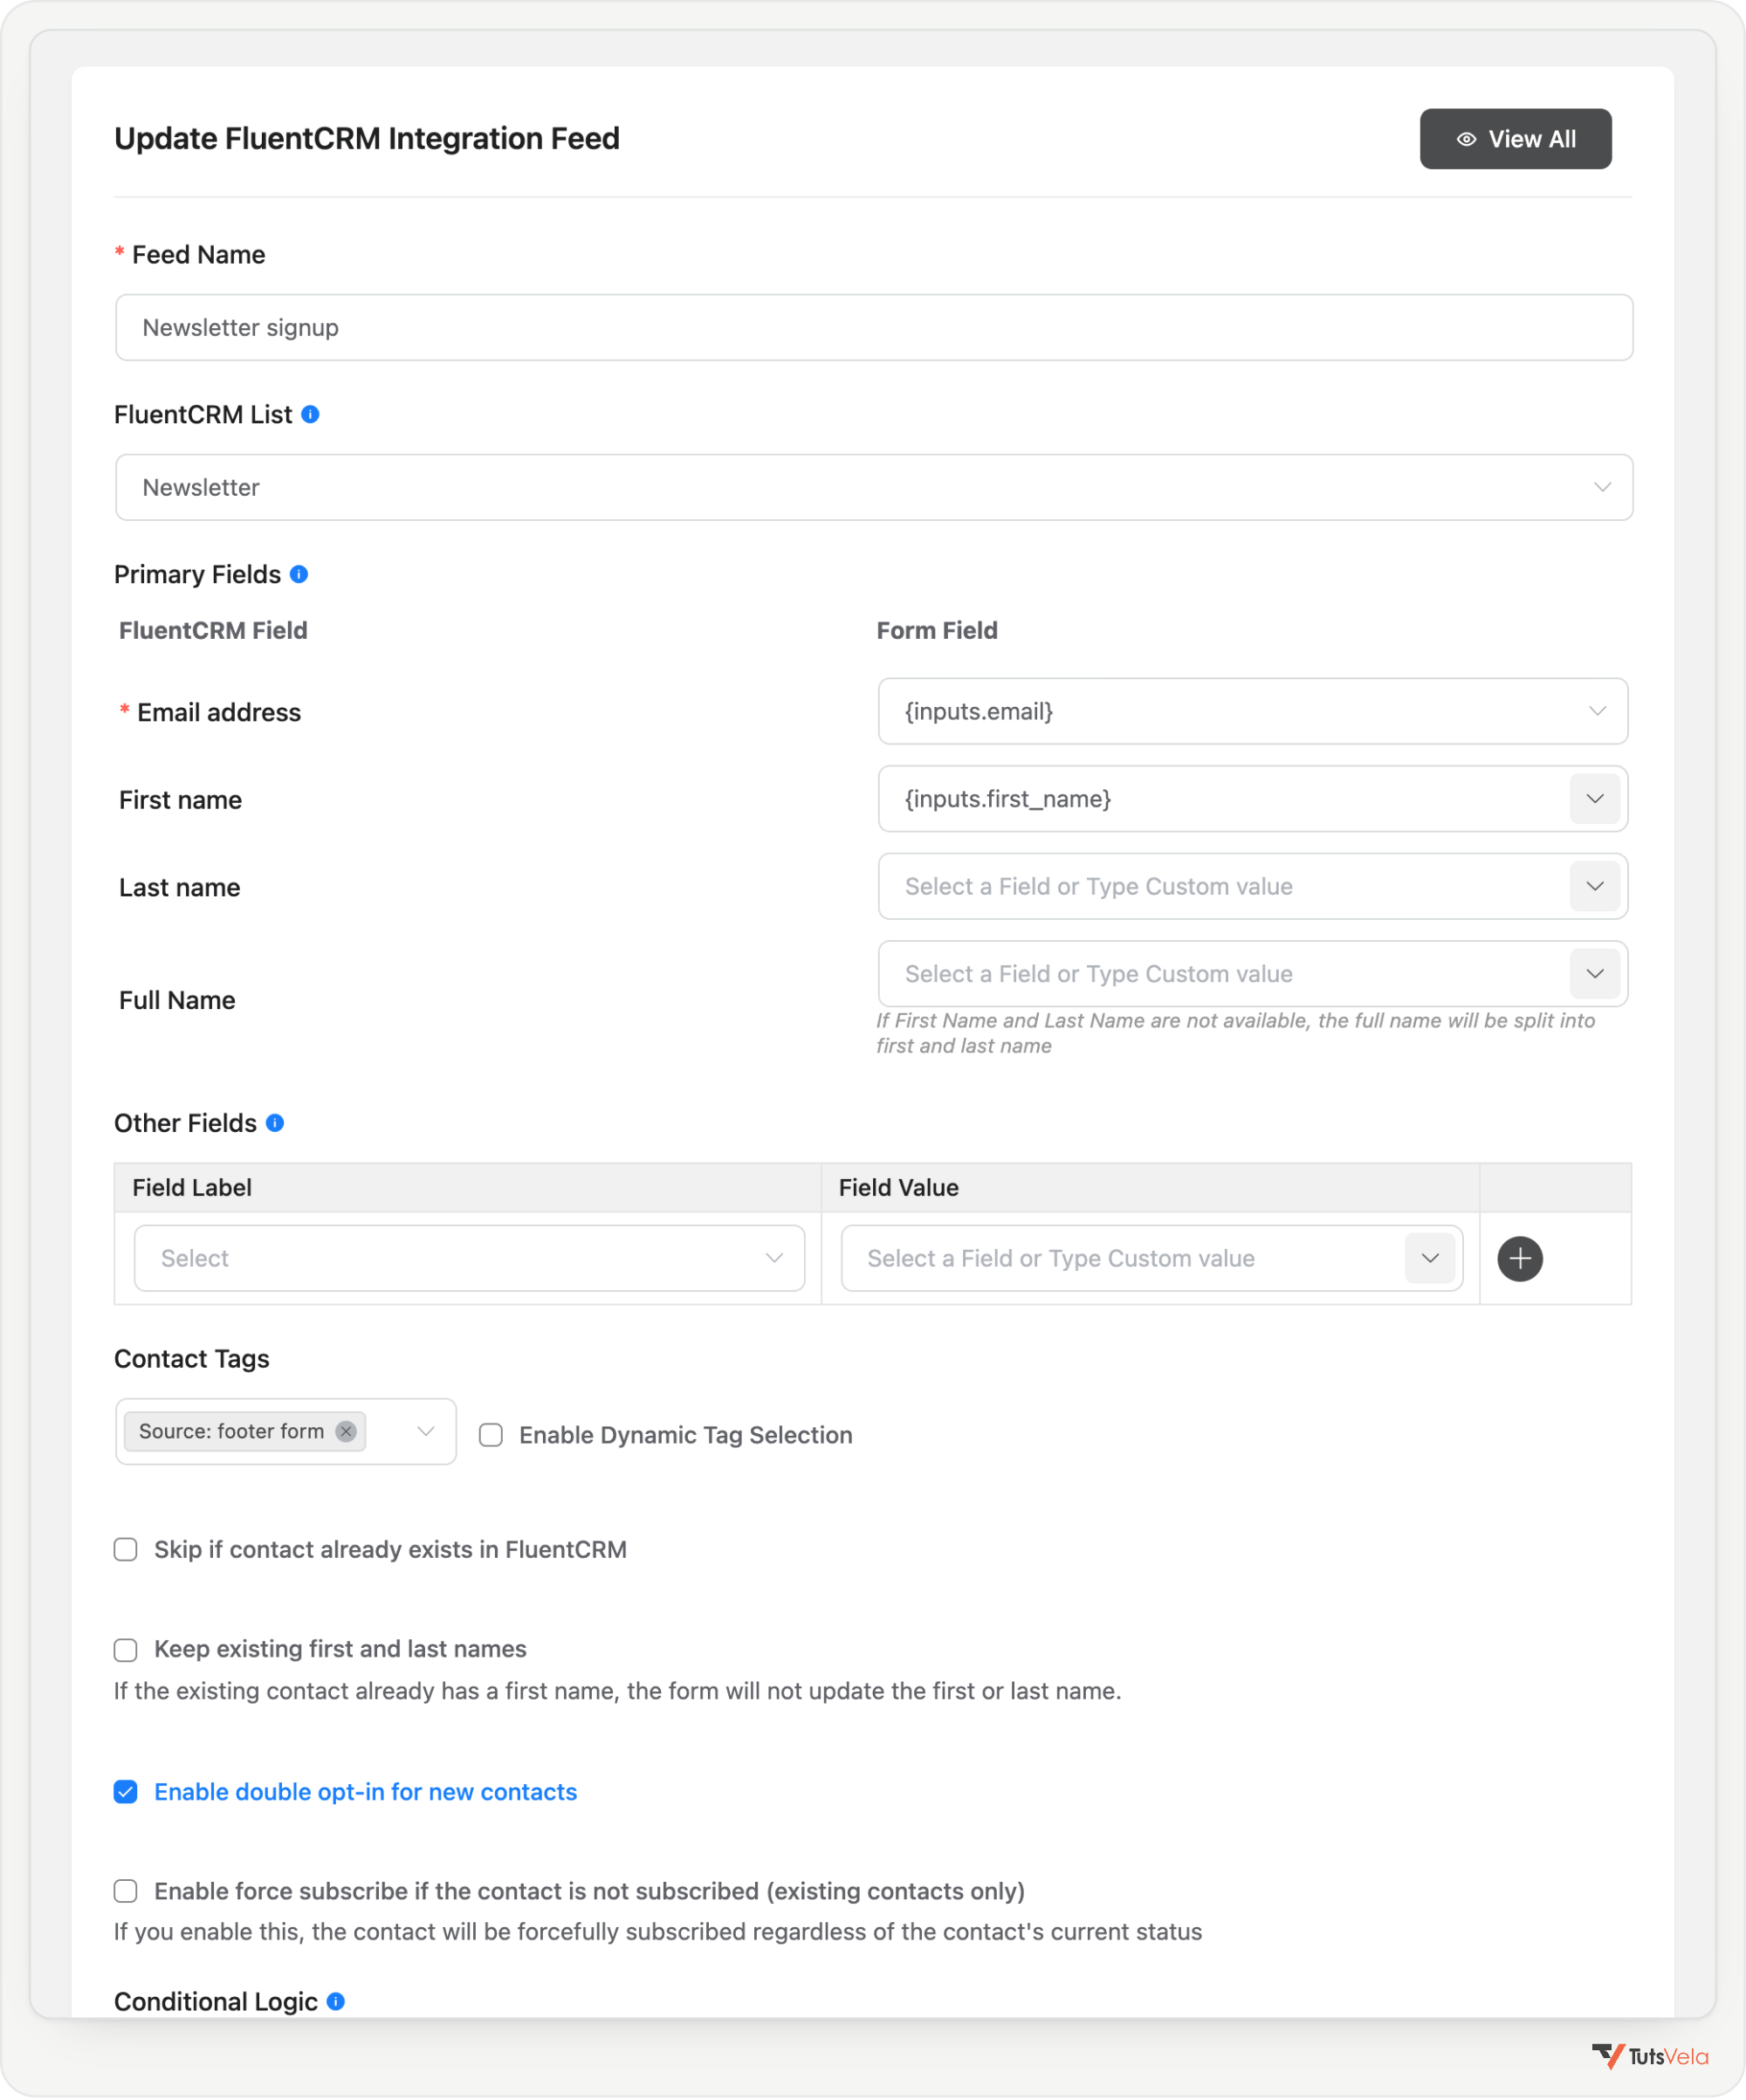
The Fluent Forms FluentCRM integration lives in a “feed” attached to your form. First create the list you want subscribers on under FluentCRM, Contacts, Lists (for example “Newsletter”), and any tags under Contacts, Tags. Then open your form and go to Settings & Integrations, Configure Integrations, Add New Integration and choose FluentCRM Integration. If the button says Configure Modules instead, enable the FluentCRM module on the Fluent Forms Integrations page first.
|
Feed field |
What to set |
Why |
|---|---|---|
|
Feed Name |
“Newsletter signup” |
Helps you find it later |
|
FluentCRM List |
Your newsletter list |
The list subscribers join |
|
Primary Fields |
Email address to your Email field; First name to your name field |
Email is required for the feed to run |
|
Contact Tags |
Optional, such as a “Source: footer form” tag |
Lets you segment or trigger automations later |
|
Skip if contact already exists in FluentCRM |
Leave unticked |
Existing contacts still get list and tag updates |
|
Enable double opt-in for new contacts |
Tick |
New contacts start as Pending and get the confirmation email |
|
Enable force subscribe if the contact is not subscribed |
Leave unticked |
Ticking it would resubscribe people who opted out |
|
Conditional Logic |
Usually off |
Only needed if one form serves several purposes |
|
Status: Enable this feed |
Tick |
A disabled feed does nothing |
Save the feed. FluentCRM runs it immediately when the form is submitted, and the result is written to the form entry’s log, which is the first place to look if a contact does not appear.
Step 3: Configure Double Opt-in
Two separate things happen when someone subscribes. The form submission is recorded by Fluent Forms. The subscription is confirmed later, when the person clicks the link in FluentCRM’s email. Keep those two ideas apart and the rest of the setup is straightforward.
Let FluentCRM own the confirmation. The feed setting from Step 2 is all you need on the form side. Fluent Forms Pro also has its own double opt-in feature (Global Settings, Double Opt-in, and a per-form Double Opt-in Confirmation option). Leave it off for this workflow: FluentCRM’s documentation notes that when both are enabled, the Fluent Forms email takes over, which means a different template and confirmation page from the ones you design in FluentCRM.
|
Status |
What it means |
Receives newsletters? |
|---|---|---|
|
Pending |
Signed up but has not clicked the confirmation link yet |
No |
|
Subscribed |
Confirmed, or added with permission |
Yes |
|
Unsubscribed |
Used the unsubscribe link |
No |
|
Transactional |
Did not opt in to marketing; essential emails only |
No |
|
Bounced |
The mail server rejected the address |
No |
|
Complained |
Reported an email as spam |
No |
Step 4: Customize the Confirmation Email
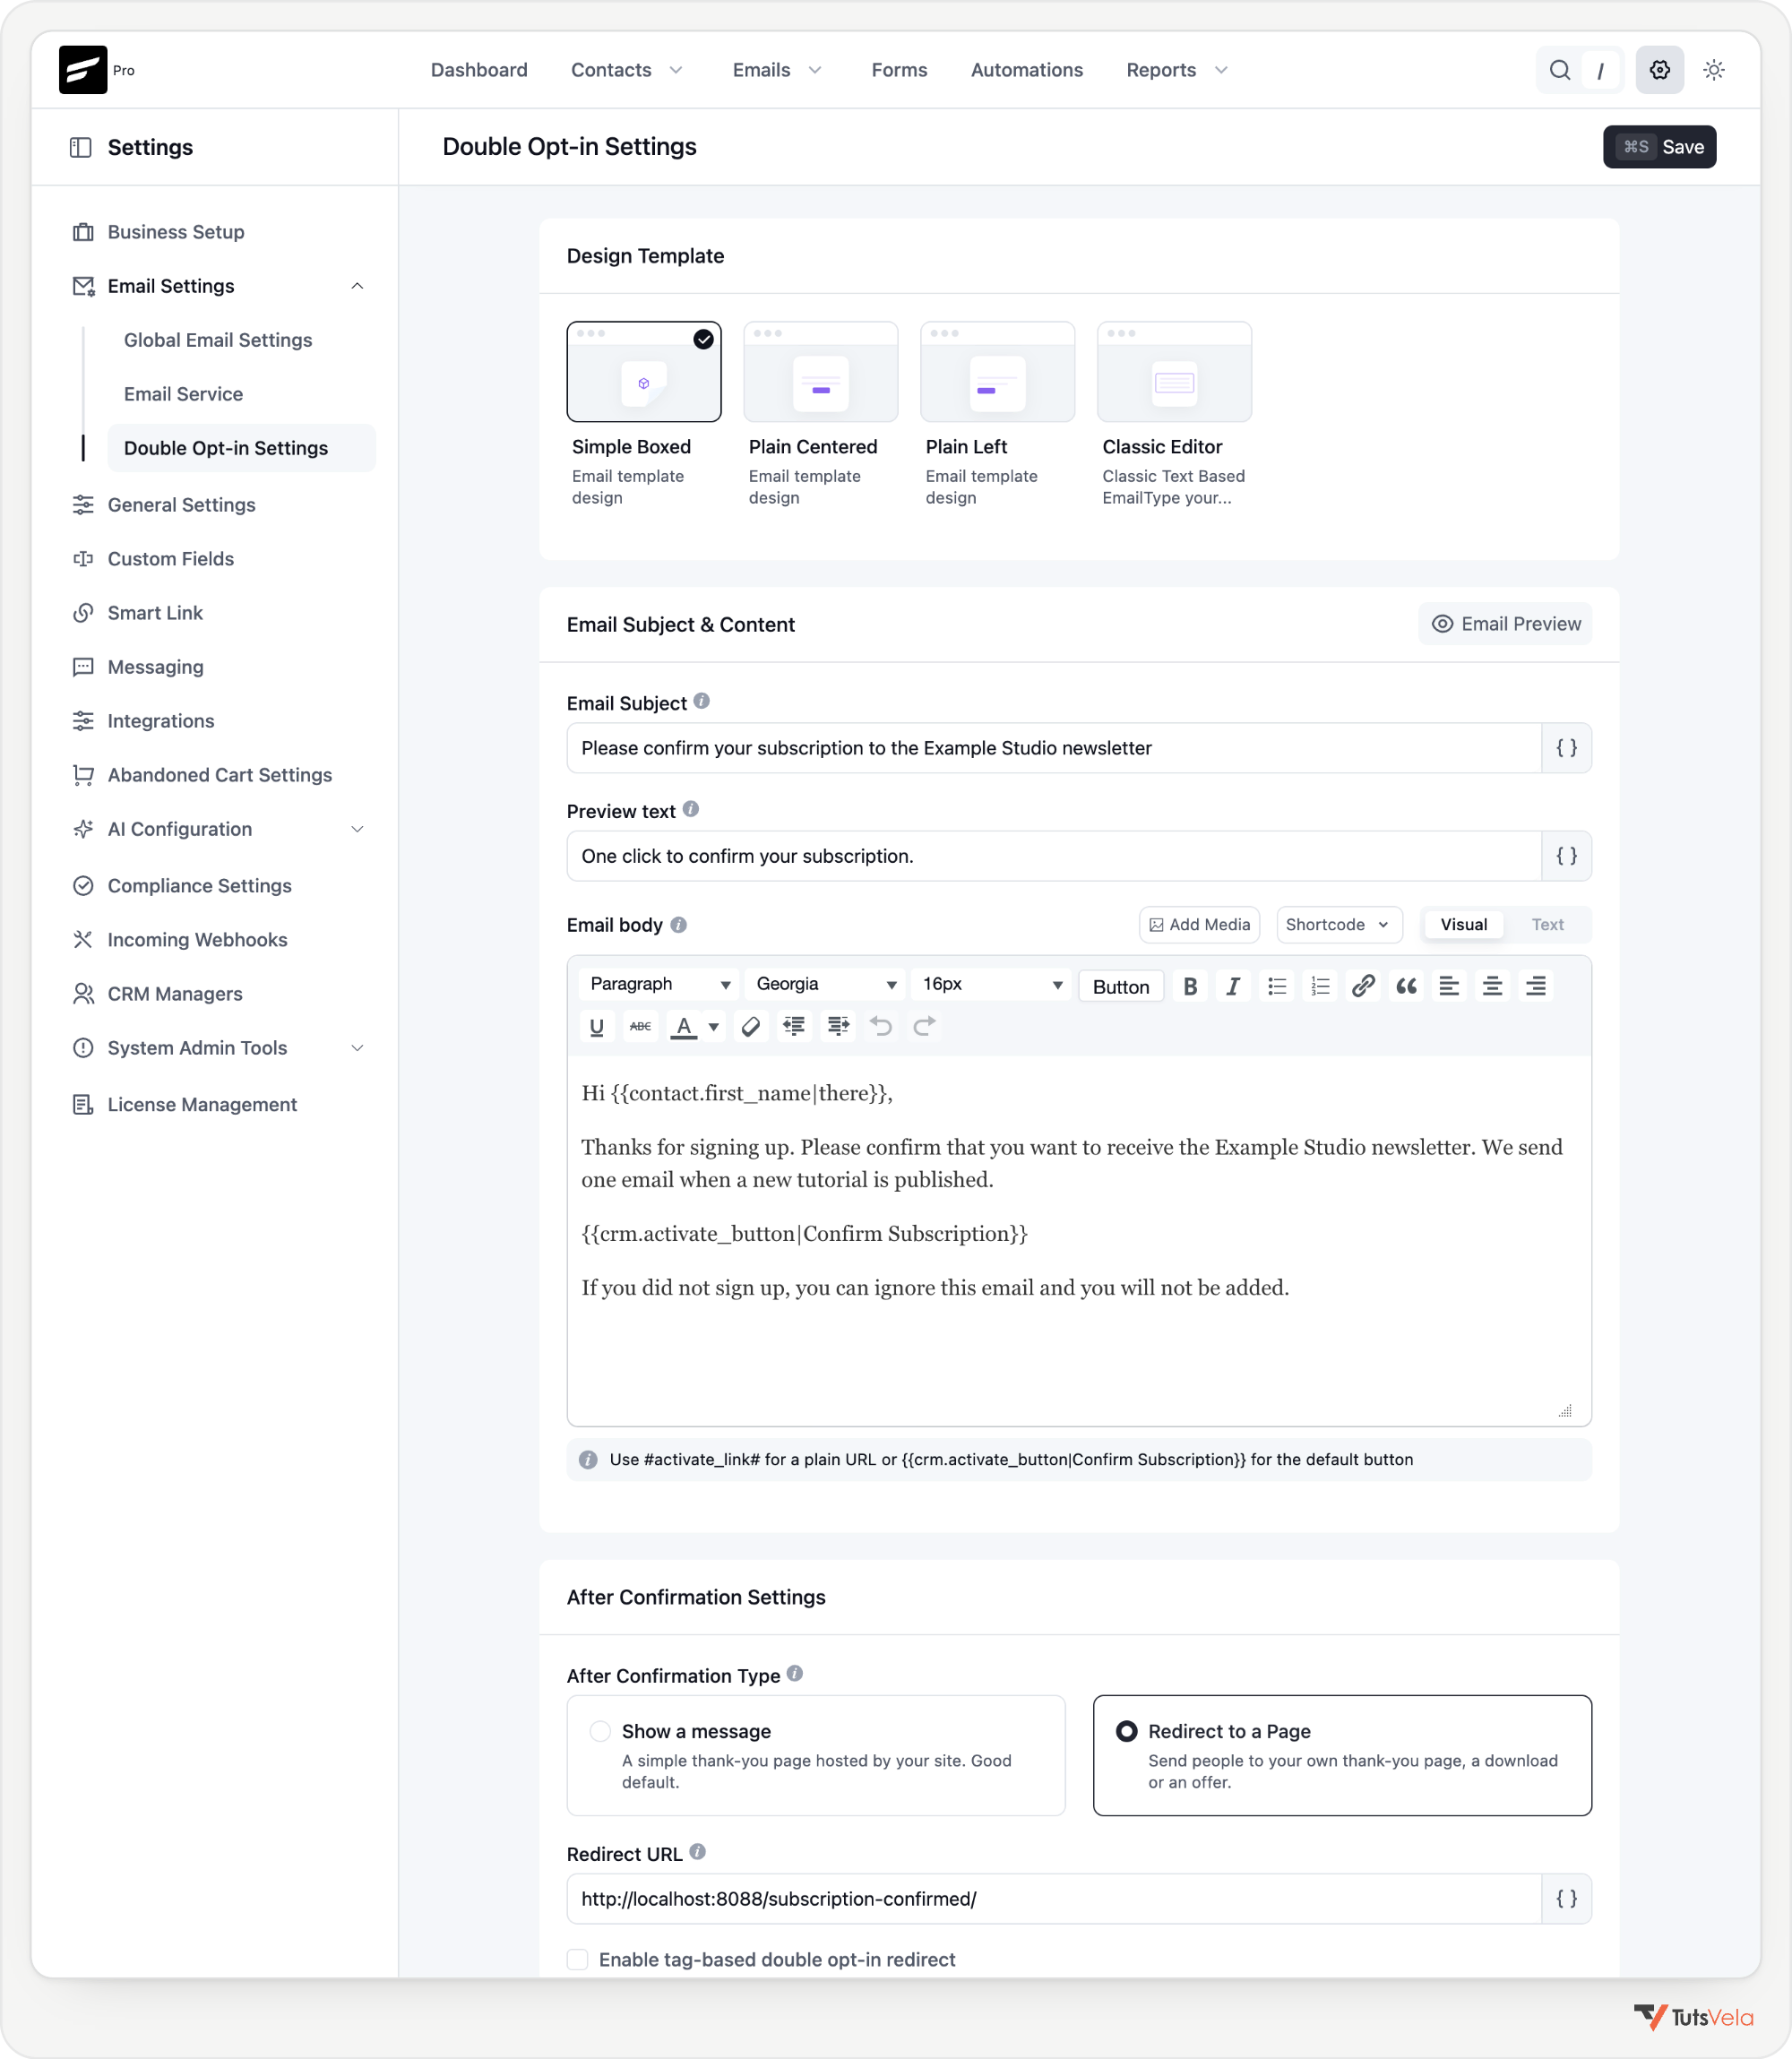
Set your sender identity first under FluentCRM, Settings, Email Settings, Global Email Settings: a recognizable From Name, a From Email Address on your own domain, and a Reply-to email that someone reads. Then open FluentCRM, Settings, Email Settings, Double Opt-in Settings.
Here is a simple example you can adapt:
Subject: Please confirm your subscription to the Example Studio newsletter
Hi {{contact.first_name|there}},
Thanks for signing up. Please confirm that you want to receive the Example Studio newsletter. We send one email when a new tutorial is published.
[Confirm Subscription button]
If you did not sign up, you can ignore this email and you will not be added.
Step 5: Create Thank-You and Confirmation Pages
Visitors pass through three stages, and each deserves its own message. Using one generic “thanks” page for all of them is the most common source of confusion.
|
Stage |
Where it is set |
Example message |
|---|---|---|
|
Form submitted |
Fluent Forms Confirmation Settings (message or page) |
“Almost done. Check your inbox and click the confirmation link.” |
|
Confirmation required |
The confirmation email itself |
“Please confirm your subscription.” |
|
Subscription confirmed |
FluentCRM Double Opt-in Settings, Redirect to a Page |
“You are subscribed. Your first email is on its way.” |
|
Unsubscribed |
FluentCRM Global Email Settings, Redirect URL After Unsubscribe |
“You have been unsubscribed. You can sign up again at any time.” |
Create the pages in WordPress as normal pages, keep them out of your menus, and consider setting them to noindex in Rank Math, since they only make sense in this flow.
Step 6: Create a Welcome Automation
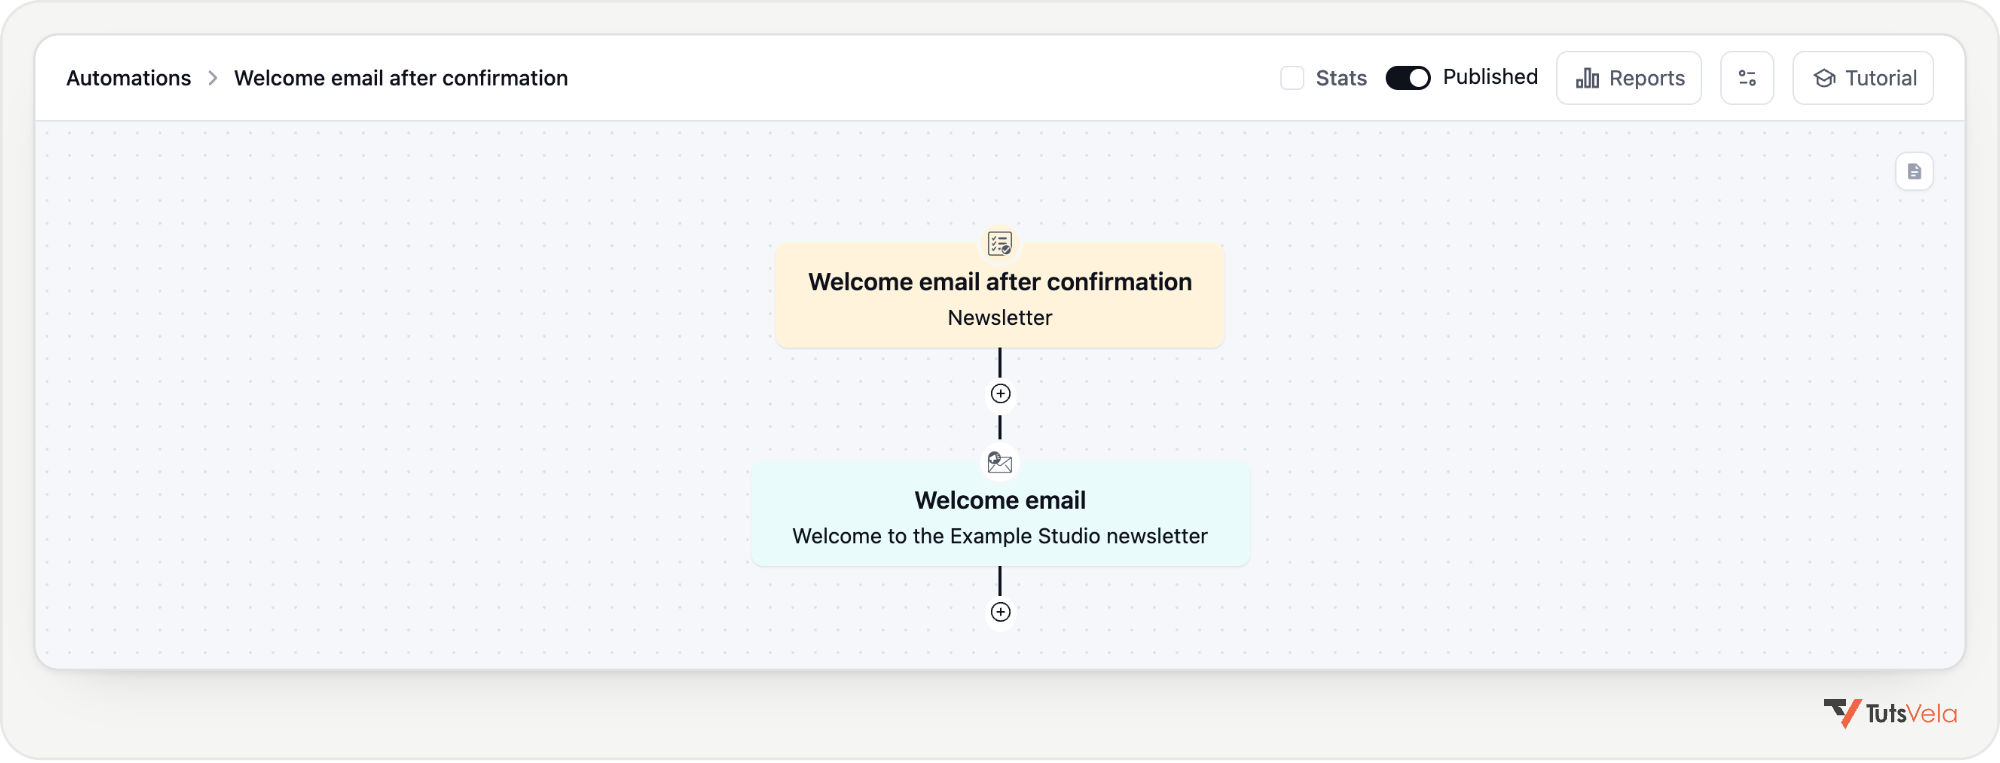
The welcome email should arrive only after someone confirms. Go to FluentCRM, Automations, + Create Automation and start from scratch.
Without FluentCRM Pro, the free plugin includes a New Form Submission (Fluent Forms) trigger. It can create the contact itself, so if you use it alongside the integration feed, make sure only one of them handles the contact and double opt-in, and test for duplicate confirmation emails.
The published automation
Trigger settings
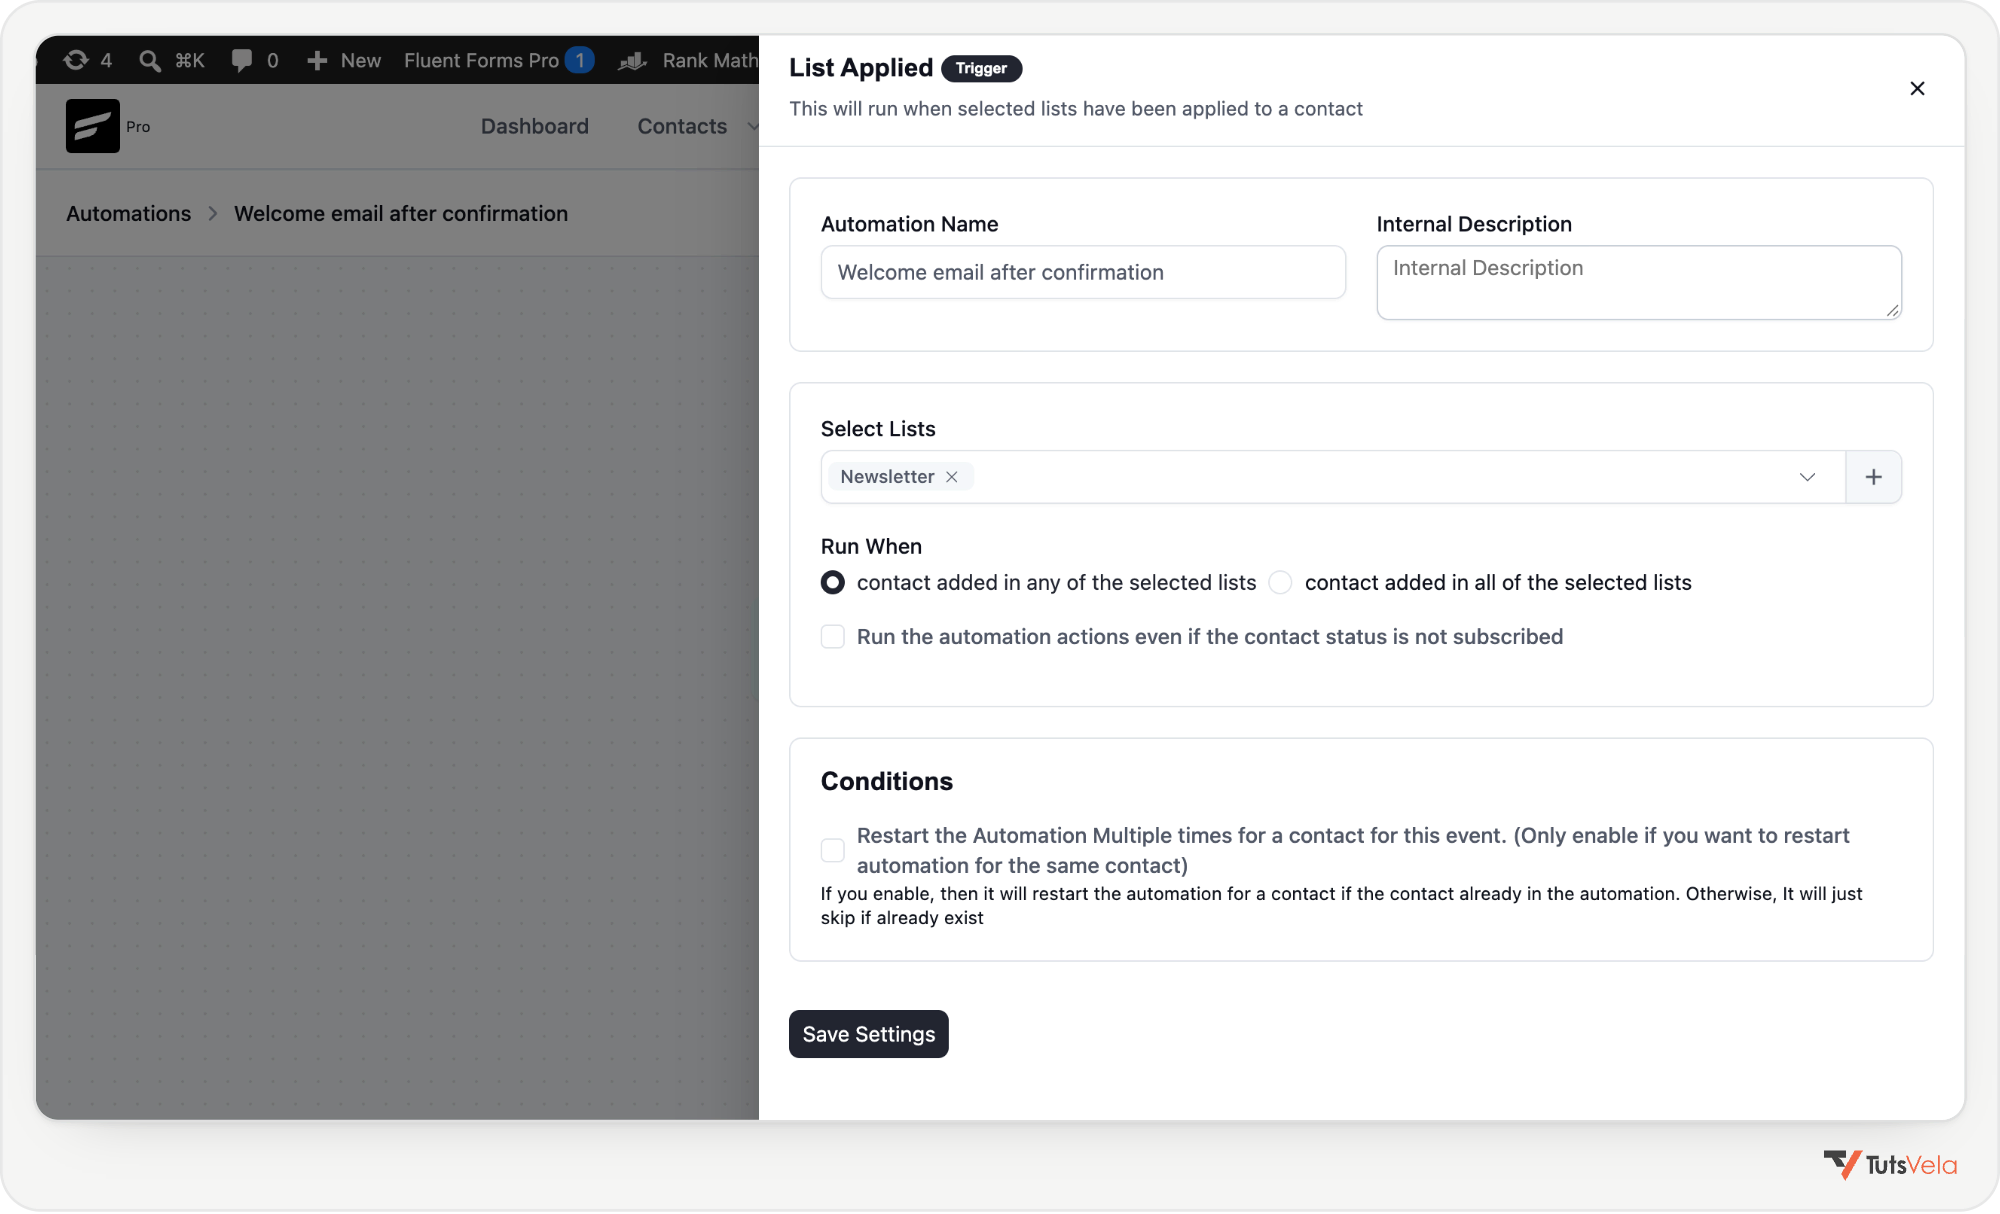
The welcome email waits until the contact confirms.
Step 7: Configure Email Delivery
WordPress sends email through your server by default, which many inboxes treat with suspicion. FluentSMTP (free, under Settings, FluentSMTP) routes WordPress email through a proper provider. It supports SMTP and API connections for services such as Amazon SES, Mailgun, SendGrid, Brevo, Postmark, Google Workspace and Microsoft 365.
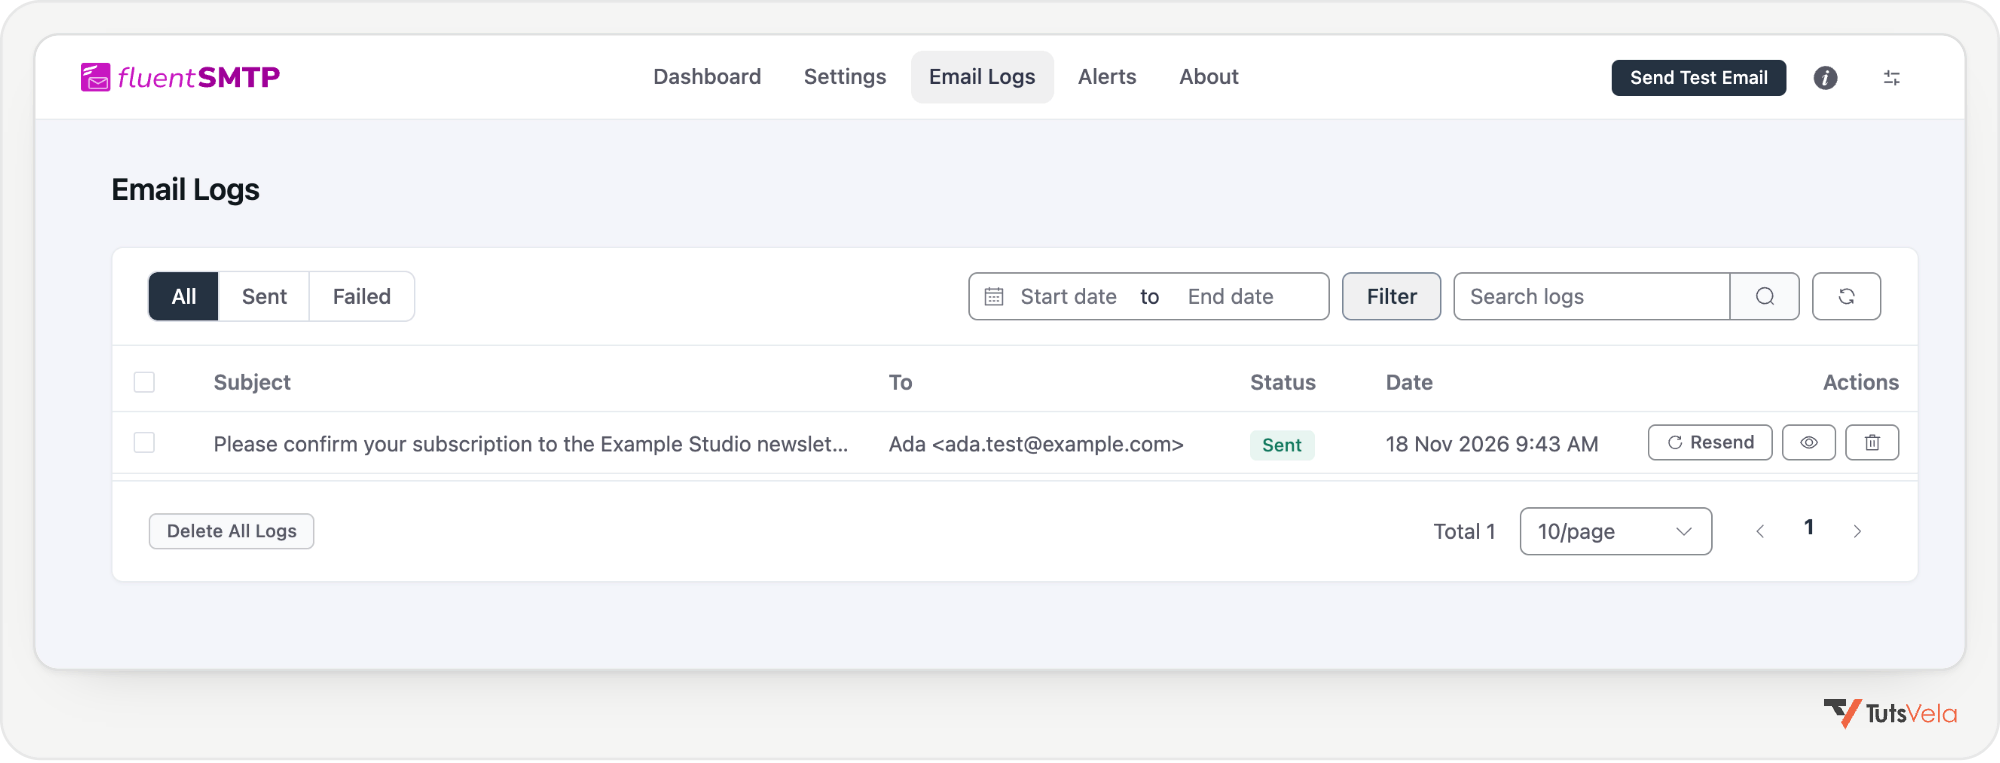
FluentSMTP’s Email Simulation option stops all delivery while still writing every message to the log. It is ideal on staging: you can confirm exactly which emails your workflow would send without emailing anyone. Remember to turn it off on the live site.
FluentSMTP improves how mail is sent; it cannot guarantee inbox placement, which also depends on your domain’s reputation and your content. FluentCRM’s confirmation email is sent straight away, but automation emails rely on WordPress cron. Check FluentCRM, Settings, System Admin Tools, Cron Job Monitor: if tasks show as overdue, follow FluentCRM’s cron checklist to set up a real server cron.
Step 8: Test the Complete Subscriber Journey
Use test addresses you control, ideally on a staging site with Email Simulation on. The table shows what to check. Results marked “tested” come from our own staging run with simulated sending; the others are what FluentCRM’s documentation and behaviour indicate, and you should confirm them on your site.
|
Scenario |
Expected result |
Evidence |
|---|---|---|
|
New subscriber |
Contact created as Pending, on the list, with one confirmation email |
Tested |
|
Submits again while Pending |
Still one contact; no second email within a few minutes |
Tested |
|
Clicks the confirmation link |
Status becomes Subscribed and the visitor reaches the confirmed page |
Tested |
|
Never clicks the link |
Stays Pending and receives no welcome email or newsletters |
Welcome hold tested |
|
Already subscribed, submits again |
Stays Subscribed; new tags added; no confirmation email |
Tested |
|
Welcome email |
Not sent while Pending; sent after confirmation with an unsubscribe link |
Tested |
|
Previously unsubscribed, signs up again |
Status unchanged until they click a new confirmation link |
Not tested |
|
No first name given |
Greeting falls back to your default text |
Not tested |
|
Sending service fails |
Error recorded in FluentSMTP Email Logs; contact remains Pending |
Not tested |
|
Cron delayed |
Confirmation still sent; welcome email waits until cron runs |
Not tested |
|
Unsubscribes |
Status becomes Unsubscribed and future marketing emails stop |
Tested |
Before confirming
After confirming
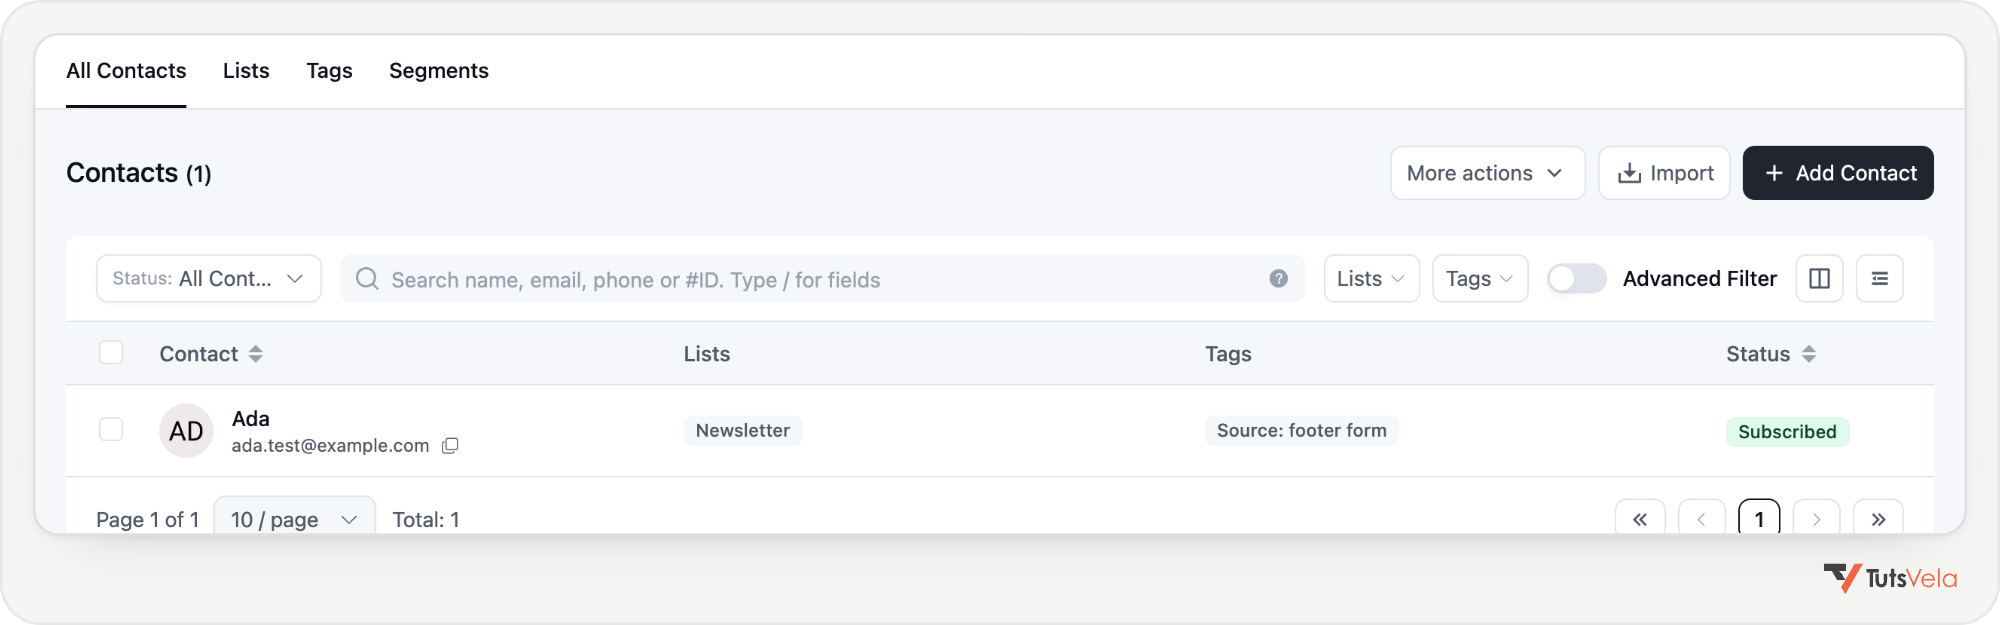
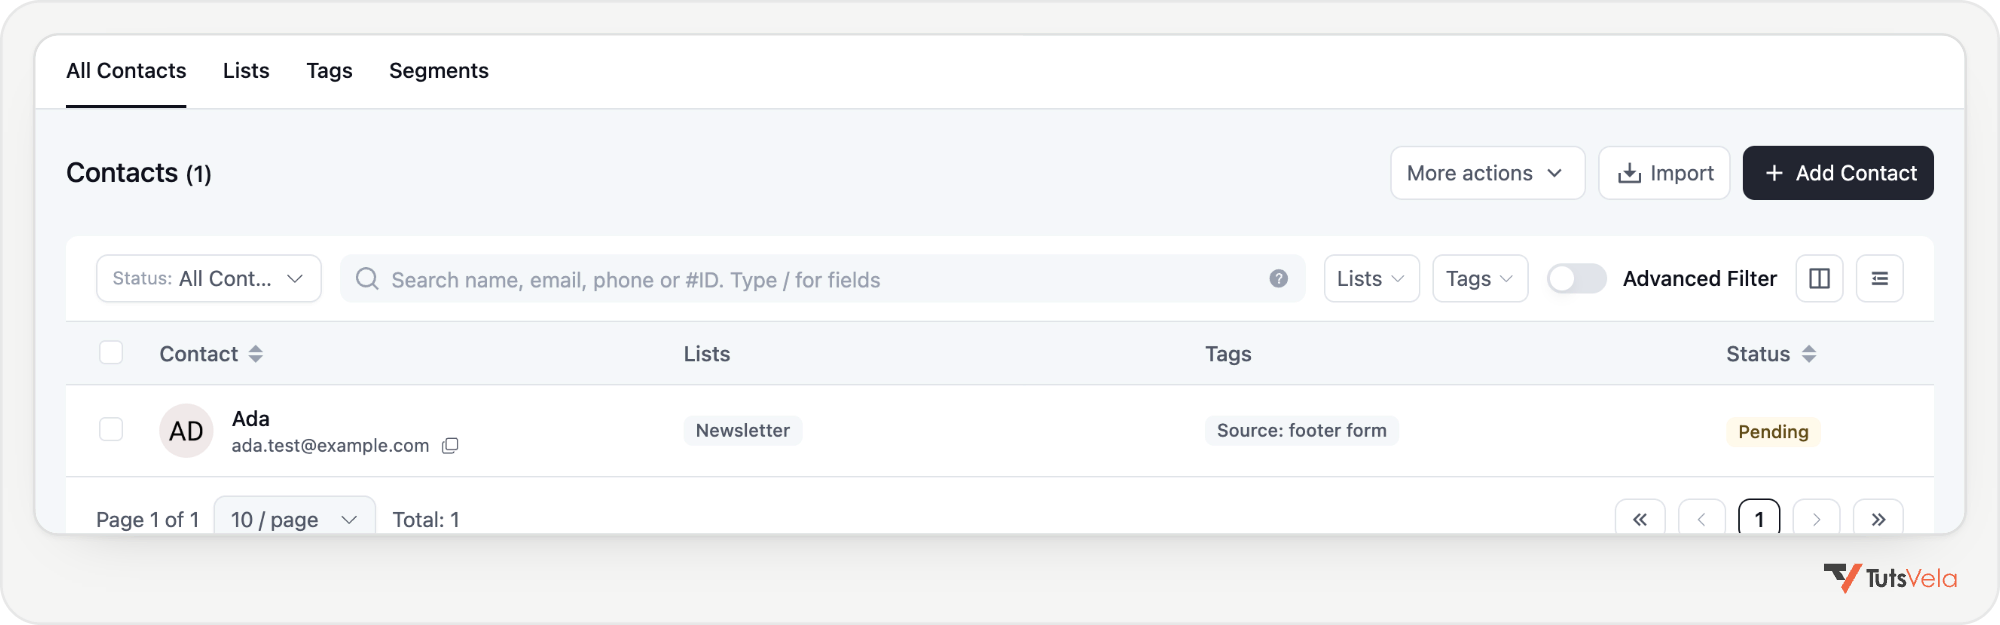
The same contact before and after clicking the confirmation link.
Step 9: Troubleshoot Common Problems
|
Problem |
Possible cause |
Solution |
|---|---|---|
|
Contact not created |
Feed disabled, conditional logic not met, or email field not mapped |
Check the feed Status, the mapping and the form entry log |
|
Confirmation email not arriving |
Empty subject or body, simulation on, or delivery failure |
Fill in Double Opt-in Settings and check FluentSMTP Email Logs |
|
No email on a quick second test |
FluentCRM limits repeat confirmation emails for a short period |
Wait a few minutes or use a new test address |
|
Wrong confirmation email template |
Fluent Forms Pro double opt-in is also enabled |
Turn off the Fluent Forms double opt-in option |
|
Subscriber stays Pending |
Link not clicked, or the email went to spam |
Check the inbox and spam folder; resend by submitting again later |
|
Welcome email not sent |
Automation in Draft, wrong list, or cron not running |
Publish it, check the trigger list, and check the Cron Job Monitor |
|
Duplicate welcome emails |
Restart option on, or two automations with the same trigger |
Turn off restart and keep one welcome automation |
|
Wrong page after confirming |
After Confirmation Type still on Show a message |
Choose Redirect to a Page and enter the URL |
|
Unsubscribe link missing |
Default email footer disabled for that email |
Re-enable the footer or add the unsubscribe smartcode |
Privacy, Consent and Unsubscribe
Double opt-in gives you clear evidence that each subscriber asked to join, and it keeps mistyped and fake addresses off your list. Whether it is legally required depends on where you and your subscribers are, so check the rules that apply to you rather than assuming either way.
Final Implementation Checklist
Frequently Asked Questions
Conclusion
A reliable newsletter signup comes down to a clear division of work: Fluent Forms collects the address, FluentCRM double opt-in confirms it and runs the welcome email, and FluentSMTP delivers both. Set the feed to create Pending contacts, let FluentCRM own the confirmation, and gate the welcome automation on confirmed subscribers.
Before you publish the form, run the test matrix on a staging copy with Email Simulation on. Ten minutes of testing will show you exactly what a new subscriber experiences, and it is far easier than cleaning up a list later. Once subscribers start arriving, the articles you send them to still need to be found in search; WordPress SEO for Google AI Overviews covers the checks.

Written by
Salman Sarwar
Founder · Full-Stack Developer, WordPress Engineer, SEO and AI Automation Specialist
Salman Sarwar founded TutsVela in 2019 and leads its web and automation projects. He records video tutorials and writes practical guides on WordPress, web development, SEO, AI tools and automation, based on the tools he uses in his own work.
WordPress · Kadence · Automation · AI micro SaaS